Search This Blog

Friday, May 3, 2024

How to Manage MacOS Disk Space using graphical treemaps: A Comparison of Disk Inventory X and GrandPerspective

Disk Inventory X vs GrandPerspecitve on MacOS

Date: 2024-05-0310:12

Introduction:

Managing disk usage on MacOS can be simplified with the right tools. Today, we're comparing Disk Inventory X and GrandPerspective. If you've ever wondered where all your disk space has gone, Disk Inventory X and GrandPerspective will help you answer this question.

Both tools use "** treemaps" to visually represent disk usage but they differ in user interface and availability. I will share some of the specifics below.

** treemaps: For more information about treemaps, you can visit http://www.cs.umd.edu/hcil/treemap-history/index.shtml.

Disk Inventory X: A Reliable Companion

Disk Inventory x was developed by Tjark Derlien (www.derlien.com)

Disk Inventory X has been a trusted app for MacOS users for years, offering a comprehensive view of disk usage. You can download it directly from the developer's homepage at https://www.derlien.com/index.html. Despite not receiving recent updates, Disk Inventory X seems to continue to function seamlessly on a wide range of Macs, from older models to the latest Intel and M1-based machines.

Developer states that "Disk Inventory X requires a computer running MacOS X 10.13 or newer". To install, simply run (double click) the app from the disk image or copy it anywhere you like. The preferred place for applications on MacOS X is /Applications or ~/Applications.

Disk Inventory X and its source code is released under GPL (gnu public license).

Once installed, you can select any folder or volume you'd like to analyze from the "File" menu. After the loading is completed, the main window opens where you see a finder-like view of the selected folder/volume on the left and a graphical view on the right. The treemap shows the files and folders in a way that easily clarifies which files and folders occupy most of the space. The selection in the finder-like view and the treemap is synchronized.

Disk Inventory X, currently at version 1.3, is a disk usage utility for MacOS that shows the sizes of files and folders in a graphical "treemaps" representing the size of each file but also as a list showing largest files first. Those are also shown in your director structure. 


[Disk Inventory X User Interface ]

Disk Inventory X uses 12 predefined colors assigned to the 8 "largest kinds" of files, with the rest of the kinds assigned to the grey color. This color assignment is made across all opened folders - files of the same kind have the same color in all opened folders.

Picture Credit : DiskInventoryX readme.rtfd file created by DiskInventoryX@derlien.com . Please visit developer page and forum at www.derlien.com.

GrandPerspective: A Versatile Alternative

The GrandPerspective application has been developed by Erwin Bonsma. Please visit this website for further references: http://grandperspectiv.sourceforge.net 

details on how to contact me.GrandPerspective, currently at version 3.4.2, is a small but powerful utility for MacOS that provides a unique two-dimensional view of disk usage within a file system. This visual representation can help you manage your disk more effectively, as it allows you to easily identify which files and folders are taking up the most space.


[Picture of GrandPerspective User Interface]

The graphical representation in GrandPerspective is logical, with each file shown as a rectangle. The area of the rectangle is proportional to the file's size. Files in the same folder appear together, but the placement of files is otherwise arbitrary, changing as you resize the view window to keep the rectangles as square as possible.

GrandPerspective requires macOS 11.0 or higher and is compatible with both Apple silicon and Intel-based processors. It's released as Open Source under the GNU General Public License. 

GrandPerspective latest updated and most reliable (paid) version is accessible through the App Store for $2.99 perpetual license at https://itunes.apple.com/us/app/grandperspective/id1111570163?mt=12 but a free version can be downloaded (at your own responsibility) on SourceForge (http://grandperspectiv.sourceforge.net/). The AppleStore option provides an added layer of reliability, as it has passed Apple Store requirements. 

For more information about the application, you can visit the website at http://grandperspectiv.sourceforge.net.

User Interface Comparison:

The user interfaces of Disk Inventory X and GrandPerspective are where the differences truly shine. Disk Inventory X presents a comprehensive view of your directory structure, a graphical representation, and a list of the largest files, all side by side. This organized approach allows users to quickly identify space-hogging files and folders.

In contrast, GrandPerspective focuses mainly on a dynamic graphical view with a tool bar on top. With that you can zoom in and out in certain areas, increase or decrease the focus area (selecting folders vs just files), use a quick look to show a file content and reveal (show location in the Finder app. This approach has an appeal for those uses looking in more details into specific areas of interest without the need of a new scan.

Conclusion:

Both Disk Inventory X and GrandPerspective offer valuable insights into disk usage on MacOS, but they cater to different user preferences. Disk Inventory X, despite its lack of recent updates, remains a reliable option with a comprehensive and simpler user interface. This simplicity may appeal to users who prefer a simpler and more comprehensive representation of their disk usage.

On the other hand, GrandPerspective offers a versatile alternative with a focus on a dynamic visual representation of your disk usage that allows you to explore it step by step but in my view, the lacking the organized directory structure and top down list of larger files that Disk Inventory X offers makes me prefer the usage of Disk Inventory X. 

From a reliability stand point, GrandPerspective is the winner since it offers users the flexibility of choosing between a free version available on SourceForge (http://grandperspectiv.sourceforge.net/) and a paid perpetual license version ($2.99) accessible through the App Store. The latter option provides an added layer of reliability, as it has passed Apple Store requirements.

Ultimately, the choice between Disk Inventory X and GrandPerspective depends on your personal preferences, compliance requirements and specific needs. Whether you prioritize availability via AppleStore, a simple comprehensive view or a visually appealing and dynamic representation that allows you to explore it further without re-scan, both utility software options can help you effectively manage your disk space on MacOS.

======================
updates: 

ps: Since I wrote this blog I found out about another app available on apple store [Disk Space Analyser] (https://apps.apple.com/au/app/disk-space-analyzer-inspector/id446243721?mt=12) and Daisy Disk . I tried Disk Space Analyser and it works well, not sure what is the difference between the free and paid versions. Will let you know when I do. 

see info below retrieved from this page: https://apple.stackexchange.com/questions/81568/a-modern-and-faster-alternative-to-disk-inventory-x

The App Store versions of both are limited functionality compared to the versions available from the developers' websites:

The paid download versions of both cost the same, USD $9.99.

The App Store version of Daisy Disk also costs USD $9.99, but if you've bought it from the App Store you can get the download version for free. The App Store version of Disk Space Analyzer is free, but it's unclear how much functionality is missing (ie. they don't say).

Neither App Store version include hidden files, so aren't going to find those leftover caches. For that you need the download version.

They look pretty similar in UI and functionality. Daisy Disk seems to have a higher profile, and includes the ability to scan your cloud storage for Dropbox, Google Drive and OneDrive. Disk Space Analyzer includes the ability to copy or move selected files as opposed to just deleting them, which could be pretty handy (noting that that comparison chart is on the Nektony site so use your own judgement there).


Sunday, March 24, 2024

How to count number of unique values on a pivot table when running excell on MacOS


If you are trying to identity how many items you have on a certain category using a pivot table like the example in green above, you will need to do a work around on a Mac, since there is no simple way to do that on a Mav (vs Windows where you can use a simple pivo table function). The work-around is create an extra column on your original data file. 

This video explain how to do it. Basically, you will create an extra colum on your pivotable with the following formula: "=1/COUNTIF(SalesStateRange,BCellValue)

This will result in a column with a fractional value that represents a share of the number of times a certain value shows on the complete range, when you add those as a Sum on your pivot table you get a total number of unique values. 

If you are in doubt, just watch the video. 


Thursday, September 7, 2023

Troubleshooting Mac Timezone Issues: Fixing Mac OS Ventura's Stuck Wrong Time Zone and Unchangeable Settings

Returning from vacation or business trip, you might encounter a frustrating situation where your Mac is stuck on the wrong timezone, and changing it seems impossible even with the automatic timezone setup. After researching various sources, I've found a solution to this problem. In this post, I'll share the steps to fix this issue on Mac OS Ventura. Apple's approach to handling timezones might have room for improvement, but you can ensure smooth functioning by following these simple steps.

Step-by-Step Guide:

If you find your Mac stuck on a vacation timezone, here's how you might resolve it:

  1. Connect to a Wireless Network: First and foremost, ensure that your Mac is connected to a wireless network. Sometimes, being connected to a wired network can cause the timezone issues
  2. Adjust Your Settings:
    1. Click on the Apple logo in the top-left corner of your screen.
    2. Choose "System Settings" from the dropdown menu.
    3. In the System Preferences window, select "General."
    4. Navigate to "Date & Time" settings.
    5. Verify Automatic Settings: Double-check that both "Set time and date automatically" and "Set time zone automatically using your current location" are turned on.
  3. See below: 
    

Summary:

By following these steps, you can probably fix the stuck timezone problem on Mac OS Ventura. It's essential to have your Mac connected to a wireless network for smoother time and timezone synchronization. Though Apple's timezone handling might have some room for improvement, taking these actions ensures your Mac operates smoothly, and you won't have to worry about being stuck in the wrong timezone after a trip.


How to fix: outlook showing wrong contact infomration - How To Reset The Outlook Nickname Autocompletion Cache on a Mac

It took me a while but this article solved my problem: 


ON a PC:

To delete a single cached entry:

In Outlook:

  1. Open Outlook.
    • Outlook 2010/2013/2016/2019: On the Home page, click New Email.
    • Outlook 2007: Click New > Mail Message.
  2. Type one or more letters of the recipient name or address; this will show memorized (cached) entries in a drop-down list.
  3. Use the arrow keys on your keyboard to select the entry to be deleted. With the entry highlighted, press the DELETE key on your keyboard.
    This removes the entry from your autocompletion cache.
On a Mac:

In Outlook for Mac 2011/2016:

  1. Open Outlook and click New email.
  2. Type one or more letters of the recipient name or address; this will show memorized (cached) entries in a drop-down list.
  3. Use the arrow keys on your keyboard to select the entry to be deleted. With the entry highlighted, press the DELETE key on your keyboard. Or you can click on the cross sign with your mouse.
    This removes the entry from your autocompletion cache.

Wednesday, March 22, 2023

XML files on Excell, the easy way

 If you have an XML data file and you would like to read that on excel just follow those steps below. 

Yes, you can open and work with XML files in Microsoft Excel. Excel can import XML data and display it in a structured table format. To open an XML file in Excel, follow these steps:

  • Open Microsoft Excel.
  • Click on the "File" tab in the top-left corner.
  • Choose "Open" from the menu.
  • In the file browser dialog, navigate to the folder where the XML file is stored.
  • In the "File type" dropdown menu (usually located at the bottom-right corner of the file browser dialog), select "XML Files (*.xml)".
  • Choose the XML file you want to open and click "Open".

Excel will import the XML data and display it in a structured table format. You can then work with the data in Excel, such as filtering, sorting, or applying formulas.

Please note that Excel may not correctly interpret or display very complex XML files or those with specific formatting requirements. In such cases, you may need to use specialized XML editing software or work with the XML file programmatically using a programming language such as Python or Java.

If you then would like to manipulate that data you can follow the instructions below: 

If you open the file on Google Sheets you can use the QUERY command.


In Excel the equivalent of this Google sheets command: "=QUERY(TabName!A:R,"SELECT N,O,P,Q,R,H")"

In Microsoft Excel, you can use Power Query to achieve similar functionality to Google Sheets' QUERY function. Power Query is a data transformation and analysis feature that allows you to import, manipulate, and analyze data from various sources.

To replicate the Google Sheets QUERY command in Excel, follow these steps:

  • Click on the "Data" tab in the Excel ribbon.
  • In the "Get & Transform Data" group, click "Get Data" and then choose "Combine Queries" > "Append Queries as New".
  • In the "Append Queries" window, choose "Two or more tables" and click "Add Table".
  • Choose the source sheet (in your example, it's "TabName") and click "OK".
  • In the Power Query Editor, select the columns you want to include in your query (in your example, columns N, O, P, Q, R, and H).
  • Click the "Home" tab in the Power Query Editor, and then click "Close & Load".

Excel will create a new sheet with the selected columns from the source sheet. Note that Power Query in Excel does not use the same QUERY language as Google Sheets, and you may need to learn the Power Query interface to manipulate and filter the data further.


Keep in mind that Power Query might not be available in all versions of Excel. It is available in Excel 2010 Professional Plus and later versions, as well as in Office 365.

Monday, June 13, 2022

How to change default "Open with:" settings on a Mac

 I I got this answer from here

==========================================

Choose a file that has the same extension as the other files that you extensively use and right click on it. Example: .mov extension (video)

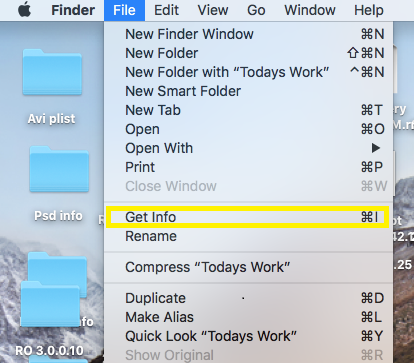
  • Select “Get Info” from the list shown in the pop-upget info
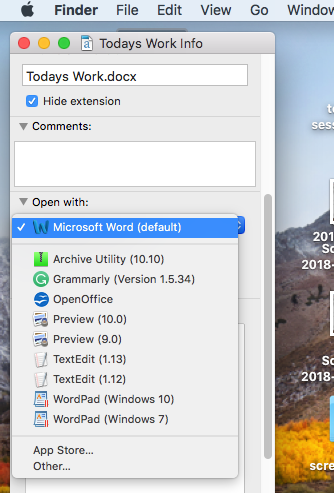
  • Choose Open With and expand the drop down to choose an app
    open with
  • Select Change All… option under Use this application label box
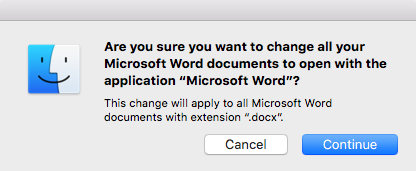
  • Finally a pop-up asking “Are you sure you want to change all similar files to open with the application” comes up, select continue to save the settings
    are you sure
  • Now the next time you open a file, it is opened using the default application of your choice

 ===========

Simple but it required me multiple searches to find the right answer. 

Thursday, March 17, 2022

How to change cell color based on day of the week - Google Sheets - Conditional format based on day of the week

I was looking for a way to change the color or a cell based on the date of the week reflected on that cell or another cell. In my case I was trying to make 2 different colors for Monday and Thursday. 

I found a discussion here that gave me hints into what I found is the best answer. See below. 

Use the function weekday(cell)=? (1 for Sunday, 2 for Monday, .....7 for Saturday). Detailed description is below (thanks to the answer by Emerson Peters on link above): 

===================================

Say the column of dates is A. Select it, Format > Conditional formatting..., Custom formula is and enter:

=weekday(A1)=1  

Choose the formatting required.

The final 1 above is for Sunday, other days follow in numeric order.


Repeat for the other required formats, adjusting the 1 as necessary for other days of the week.

Because these rules do not conflict (each date is only one specific day of the week) the order in which the rules are added (with "+ Add another rule") does not matter.

===================================


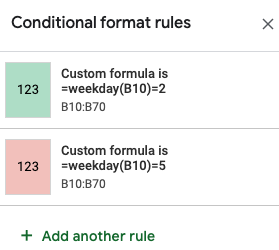
I have used this process and created Conditional Format rules to make Mondays Green and Thursdays Pink. As below see results and conditional format formulas:


Results: 


Conditional format rules:


I hope this helps you and it did to me. 

Labels

problems (8) windows 10 (7) Windows 7 (6) thunderbird (5) iPhone (3) Excel (2) MacOS (2) calendar (2) chrome (2) lightning (2) mac os (2) problem (2) tips (2) Apple on windows (1) Bluetooth (1) Costco (1) Disk Incentory X (1) Excel tips (1) GrandPerspective (1) MS Office (1) Mac (1) MacMini (1) Magic trackpad (1) Microsoft Compatibility Telemetry (1) N900 (1) Netgear (1) Office 2007 (1) OneNote (1) TWS (1) ThunderBrowse (1) Timezone (1) Trello on Thunderbird (1) Ventura (1) WNDR4500 (1) Web (1) WebPG (1) Window Maximize (1) Windows XP (1) adobe (1) associations (1) auto-complete (1) autocomplete (1) cell color (1) changes (1) conditional format (1) consolidation (1) create text file (1) day of the week (1) disabled (1) dish (1) dish network (1) disk (1) embedded document (1) excell (1) extension (1) file utilities (1) finger (1) fingerprint (1) firefox (1) folder consolidation (1) font (1) font size (1) forgot password (1) google sheets (1) high cpu usage (1) i7-TWS (1) iOS 10 (1) iPhone 5 (1) iPhone device (1) issue (1) itunes (1) japanese (1) java (1) keyboard (1) language (1) lock screen (1) log in problems (1) login problems (1) lower bill (1) magic mouse (1) mail (1) maximize (1) media server (1) mouse drifting (1) mouse problems (1) new file (1) new text file (1) pdf (1) picture management (1) pictures (1) pivot table (1) portege z30-a (1) reading japanese (1) recovery (1) reduce (1) reference same cell (1) rename device (1) rikai (1) search (1) security (1) snipping (1) snipping tool (1) spotlight (1) telemetry (1) text file on mac (1) time (1) todo (1) toshiba (1) treemaps (1) unique values (1) update (1) utilities (1) weekday format (1) word (1) worksheets (1)